Soups & Stews
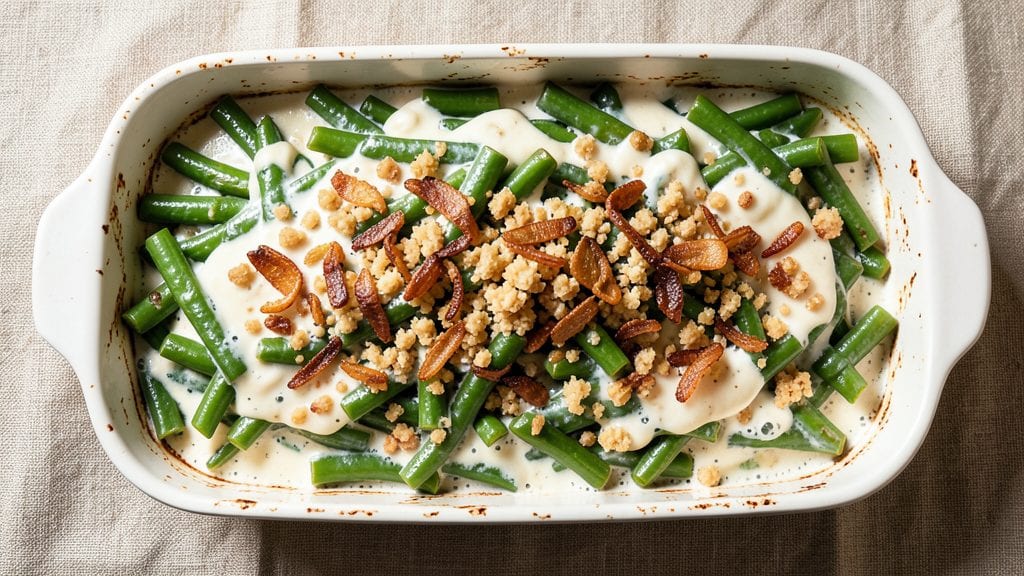
This no-soup green bean casserole delivers all the comfort of the classic while solving the one problem that always frustrates home cooks: soggy toppings. After years of testing variations—including Nana Mae’s original diner recipe—I perfected a crispy, golden breadcrumb crust that stays crunchy even after reheating.
The secret lies in a precise baking technique and the right ratio of milk to cream in the sauce.
What sets this version apart is the foolproof crispy top, achieved without a single drop of canned soup. Instead, we build flavor through sautéed onions, garlic, and a touch of mustard to brighten the creamy sauce.
Fresh green beans hold their texture beautifully, while the buttery breadcrumb topping transforms this into a dish that’s equal parts nostalgic and restaurant-worthy. David insists this is the only version he’ll eat—no compromises on texture or taste.
By the time it emerges from the oven, you’ll have a crispy-edged, creamy-centered casserole that’s ready to serve directly from the baking dish. The aroma alone will have everyone gathering at the table, and the first bite delivers that perfect contrast of crunchy topping and tender beans.
This is the kind of dish that disappears faster than you can say “seconds, please.”
Works equally well as a holiday centerpiece or a weeknight dinner—just adjust the baking time. The recipe scales perfectly for crowds, and leftovers reheat beautifully. Let’s make this the green bean casserole you’ll actually want to serve.
Ingredients for green bean casserole recipe no soup
Sixteen ingredients for a casserole that’s crispy on top and creamy inside—no soggy surprises here.
| Ingredient | Amount | Notes |
|---|---|---|
| Fresh Green Beans 🥦 | 2 lbs | Trimmed, cut into 2-inch pieces |
| Yellow Onion 🧅 | 1 whole | Diced, about 1 cup |
| Garlic Cloves 🧄 | 4 cloves | Minced, fresh preferred |
| All-Purpose Flour 🌾 | ¼ cup | For thickening sauce |
| Whole Milk 🥛 | 1 cup | Full-fat for creaminess |
| Heavy Cream 🥛 | ½ cup | Full-fat for richness |
| Dijon Mustard 🍯 | 1 tbsp | For brightening flavor |
| Salt 🧂 | 1 ½ tsp | Kosher or sea salt |
| Ground Black Pepper 🌶️ | ½ tsp | Freshly ground preferred |
| Unsalted Butter 🧈 | ½ cup | Melted, salted to taste |
| Plain Breadcrumbs 🍞 | 1 ½ cups | Panko for extra crispiness |
| Parmesan Cheese 🧀 | ½ cup | Freshly grated, optional |
| Shredded Cheese 🧀 | 1 cup | Sharp cheddar or mozzarella |
The green beans are the star, so pick fresh, crisp ones—the thicker the bean, the better. Trader Joe’s or local farmers markets usually have the best selection. If you’re using frozen, no need to thaw—just drain well. The onions and garlic? Sauté them until golden—this builds the flavor base for the whole dish. I always double-check my onions for moisture before adding them to the sauce, or you’ll end up with a watery mess. For the flour, King Arthur or Gold Medal brands work best—they thicken smoothly without clumping.
No fresh green beans? Frozen works perfectly—just don’t skip the draining step. Out of Dijon mustard? Yellow mustard at half the amount gets you close. The breadcrumbs are non-negotiable for that crispy top—panko is your best friend here. If you’re feeling fancy, toast them in the oven with a little butter first. The Parmesan adds depth, but if you skip it, the cheddar or mozzarella will still deliver that cheesy pull. And if you’re making this ahead? Assemble it the night before—the flavors meld beautifully overnight.
This casserole reheats like a dream—350°F for 15-20 minutes until the edges are bubbly. Store leftovers in the fridge for up to 4 days, covered tightly. For freezing, bake it first, then portion into airtight containers—keeps for 3 months. Pro tip: If the top loses its crispiness after reheating, just pop it under the broiler for 2-3 minutes. Trust me, it’s worth the extra minute.
Why You'll Love This Recipe
- One-Pan Magic: I swear by this recipe when I’m too tired to wash dishes. Fresh green beans and onions caramelize right in the skillet while the flour-milk roux thickens into a creamy sauce—no soup pot, no extra bowls. Just one pan, one spatula, and zero guilt over cleanup.
- Garlic-Kissed Crunch: That crispy edge on the green beans? It’s all in the flour-toast trick—lightly coating them before baking until golden. The garlic? Oh, it’s there—warm, fragrant, and cutting through the richness of the milk sauce like a secret weapon.
- Potluck Star: Between us, this is my go-to for holiday gatherings when I don’t want to stress. It reheats beautifully, travels well (no soggy sides here), and honestly? People always ask for the recipe. Bring it to Thanksgiving, a summer BBQ, or even a casual dinner—it’s that reliable.
- Budget Buster: Fresh green beans might seem pricey, but this recipe stretches them. A single batch feeds four, and leftovers taste just as good the next day (yes, even on a Tuesday night). Plus, milk and flour are pantry staples—no fancy ingredients, just pure satisfaction.
Step-by-step instructions for green bean casserole: no-soup crispy top Magic
Here's how to create that legendary crispy topping without canned soup—simple, foolproof, and packed with flavor.
Blanch and Prepare the Green Beans
Start by trimming the ends off the 2 lbs fresh green beans and cutting them into 2-inch pieces. This size ensures even cooking and better texture in the final dish. Bring a large pot of salted water to a rolling boil and add the green beans. Cook for 5-6 minutes until they're bright green and tender-crisp—they should still have a slight bite when you test one.
Drain the beans immediately in a colander and rinse them under cold water to stop the cooking process. This blanching step removes any bitterness and ensures the beans stay vibrant in your casserole. Transfer the drained beans to a large bowl and set aside. You'll want to work quickly now so they don't get soggy while you prepare the sauce.
Sauté Onion and Garlic for Flavor Foundation
In a large skillet, melt the 0.5 cup unsalted butter over medium heat. Add the 1 whole yellow onion (diced) and cook for 5-6 minutes until softened and translucent. Here's where the flavor really starts building—don't rush this step. You want the onions to caramelize just slightly at the edges.
Add the 4 cloves minced garlic and cook for another 30 seconds until fragrant. Be careful not to let the garlic burn—it should smell amazing but not bitter. Remove the skillet from heat and let it cool slightly. This aromatic base will infuse the entire casserole with rich, savory depth that you can't get from canned soup.
Make the Creamy Sauce
In a medium saucepan, combine the sautéed onion and garlic mixture with the 0.25 cup all-purpose flour, stirring constantly to create a paste. This is your roux—the foundation of the creamy sauce. Gradually whisk in the 1 cup whole milk and 0.5 cup heavy cream, stirring continuously to prevent lumps from forming.
Return the saucepan to medium heat and cook for 5-7 minutes until thickened. The sauce should coat the back of a spoon and be smooth with no graininess. Stir in the 1 tbsp Dijon mustard, 1.5 tsp salt, and 0.5 tsp ground black pepper. Taste and adjust seasoning if needed—this is where you build the flavor profile. Remove from heat and let cool slightly before mixing with the beans.
Assemble and Bake the Casserole
In a large mixing bowl, combine the blanched green beans with the cooled sauce mixture. Stir gently but thoroughly to coat each bean evenly. Transfer the bean mixture to a 9x13-inch baking dish and spread it out in an even layer. This even distribution ensures the crispy topping cooks perfectly and every bite gets that creamy bean goodness.
Preheat your oven to 375°F. In a separate bowl, mix together the 1.5 cups plain breadcrumbs, 0.5 cup shredded cheese, and 0.5 cup Parmesan cheese. Sprinkle this mixture evenly over the top of the green beans, pressing down lightly with your fingers to help it adhere. The breadcrumbs will create that signature crispy texture we're all craving.
Bake to Golden Perfection
Place the baking dish on the middle rack of your oven and bake for 25-30 minutes until the top is deep golden brown and the edges are bubbling. The breadcrumb topping should be crispy enough to stand up to a gentle poke with your finger—this is your signal that it's ready.
Let the casserole rest for 5-10 minutes before serving. This resting time allows the juices to redistribute, ensuring each forkful is creamy and flavorful. The contrast between the crispy topping and tender beans makes every bite worth waiting for. Serve warm with crusty bread to soak up all that delicious sauce!
Pro Tips For Making Green Bean Casserole Recipe No Soup
- TRIM BEANS LIKE A PRO: Cut the ends off your green beans at a 45-degree angle—this makes them look neater when arranged in the dish and prevents them from rolling away while baking. I used to hack them straight across and always ended up with a messy, uneven bed. A sharp knife and a steady hand make all the difference.
- COOK ONIONS UNTIL SOFT: Sauté the diced onion until it’s nearly translucent and just starting to caramelize—about 8-10 minutes on medium heat. Stopping too early means your sauce will taste raw, and letting it burn ruins everything. Add a pinch of salt here to draw out moisture and speed things up.
- WHISK FLOUR INTO MILK SLOWLY: Pour the flour into the cold milk a little at a time while whisking constantly—this prevents lumps like nothing else. I learned this the hard way after scraping globs out of my sauce for the third time. If you’re in a rush, use a fine-mesh strainer to sift the flour in first.
- BAKE UNTIL BUBBLY AND GOLDEN: Pull the casserole out when the top is golden and the edges are set—but before it’s fully dry. Overbaking turns the sauce rubbery and the beans mushy. If unsure, cut a slit in the middle: if it’s still slightly jiggly, give it 2-3 more minutes.
Perfect pairings for green bean casserole recipe no soup
Crispy Side Pairings
This casserole pairs beautifully with garlic mashed potatoes—their buttery creaminess balances the crispy top perfectly. I like to make a batch using Central Market's Yukon Gold potatoes and European-style butter for extra richness. The contrast of textures makes every bite unforgettable. 🍽️
Protein Additions
For a heartier meal, serve with pan-seared chicken thighs or smoked sausage links. I often cook Applegate uncured chicken sausage in the oven alongside the casserole—just 20 minutes at 375°F until golden. The smoky flavor complements the creamy sauce beautifully.
Beverage Matchups
A crisp Sauvignon Blanc from New Zealand cuts through the richness while enhancing the green beans' natural brightness. For beer lovers, a Belgian witbier like Stella Artois adds a refreshing citrus note. I always keep a bottle chilled—David insists it's the perfect pairing. 🍷
Holiday Table Centerpiece
Transform this into a showstopper by arranging it on a wooden serving board with fresh rosemary sprigs scattered on top. The golden crust looks stunning against the green beans, making it perfect for Thanksgiving or Christmas dinner. Guests will ask for seconds before they even taste it!
Make-Ahead Magic
Assemble the casserole up to 24 hours ahead and refrigerate uncovered—this helps the top crisp up even more when baked. I often prep mine the night before Thanksgiving to save time. Just add 5-10 extra minutes to baking time if starting cold from the fridge. 💫
Kid-Friendly Twist
For picky eaters, serve with buttered dinner rolls and let them dip the crispy topping into the creamy sauce. The fun texture contrast makes it more appealing. I've seen Emma and Jack fight over the last bite—proof this works with kids too!
Nutrition facts
Frequently asked questions
Why does this recipe skip the canned soup?
This version replaces canned soup with a homemade creamy sauce made from milk, cream, and a roux for richer flavor and better texture control. The sauce builds depth with sautéed onions and garlic, while Dijon mustard adds brightness—no watery or overly salty canned soup needed. Plus, it avoids the preservatives in many canned soups.
Can I use frozen green beans instead of fresh?
Just thaw and drain frozen beans thoroughly before using. For best texture, don't skip the blanching step—it keeps them vibrant. Frozen beans work perfectly and save time, especially during off-season months. The recipe yields the same delicious results.
How do I keep the breadcrumb topping extra crispy?
The secret is baking at 375°F until golden brown and letting it rest 5-10 minutes before serving. For extra crunch, toast breadcrumbs with 1 tbsp melted butter for 5 minutes at 350°F before topping. Press them gently into the sauce to help them adhere.
Can I make this ahead for Thanksgiving?
Yes! Assemble the casserole up to 24 hours ahead and refrigerate uncovered. This helps the topping crisp up beautifully when baked. Add 5-10 extra minutes to baking time if starting cold. The flavors meld overnight for even better taste.
What if my topping gets soggy?
Soggy topping usually means the sauce was too wet or the oven wasn't hot enough. For next time, preheat thoroughly and bake until the edges bubble. If it happens, broil for 2-3 minutes at the end to revive the crunch. A sprinkle of extra breadcrumbs before baking also helps.